Saturday, 28 February 2009
Thursday, 26 February 2009
Chapter 10 Stitch to Translate


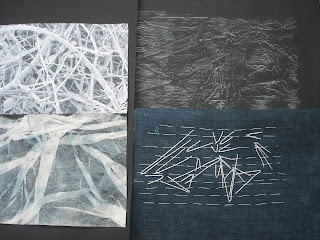
I have tried to translate some of my rubbings into stitches but found it difficult to do anything varied as so many of my photos of trees are just stems, twigs etc. So I have gone ahead and made 3 samples but I am going to take some new photos for the resolved sample and make some more studies in embroidery for that.
Monday, 23 February 2009
Chapter 9 Threads and Stitchery & gathering(ch6)

Lastly I have taken rubbings from paper relief surfaces. I tried chalk, wax crayons, watersoluble crayons and oil pastels on tissue paper. I found the water soluble ones the best. I am posting one example but the others will be best shown alongside the embroidery interpretation.


The next 2 samples were made using a machine to gather and several types of fabric were used, fed in at different angles. The coloured sample includes plastic fruit netting as one of its materials.


Ialso found my gathering samples. The first 2 were done by hand, marking the spaces in the traditional way for smocking.

Wednesday, 18 February 2009
MODULE 5 - Texture in Landscape Chapters 1-8
 The left sample shows rolled thick cotton and on the right silk organza corded with knitting wool.
The left sample shows hand sewing threads as wadding under polyester organza, the right showspolyester crepe de chine gathered to form soft rows and then hand stitched in parallel angled lines in order to distort.

The left sample shows polyester sher net shadow quilted with threads onto cotton wadding, and the right shows cotton muslin padded quilted with knitting wool.

The left sample shows polyester net gathered into circles by hand, and the right shows silk habotai gathered the same way.
 The left sample shows cotton muslin pleated and scrunched, the right shows calico corded with string and caught in places to distort.
Finally in chapter 8 I gathered these design ideas together and these pictures show prints of trees with paper and two fabric relief surfaces.

The next picture shows various fabric manipulations which display varying texture.


In chapter 6 I looked at tucks, pleats and gathers and added in work from my previous course.


Lastly I tried padded quilting using knitting wool threaded trapunto style, buttons poured in which made a nice rouleaux shape in places andstring under Japanese paper. The latter tore the paper in places but I liked the effect where the string showed through. I have added a picture of glass beads used as filling but this should really be in shaped quilting.


Next I tried shaped quilting and used knitting wool with the stitching following the curves of the wool, metal grid, glass beads and pieces of wadding as filler.


I have also used threads to create padding or stitches instead of quilting as in shadow quilting. The bird design is on silk organza using linen thread for the stitching.

Previously I have tried wadded quilting using stretchy coloured tights to make this design based on a cartoon I saw in a magazine.


In Chapter 5 I examined types of quilting. Firstly I made samples of wadded quilting, using either cotton batting, hand embroidery threads under a vilene type product, and thick knitting wool as the wadding.


Next I tried different edge effects on a variety of fabrics.


After doing tests on various fabrics which I had at home I have grouped snippets onto black paper.


Lastly I tried gathering a few papers. Sorry the picture is horizontal but my photo programme wouldn't work today!


Using further types of paper I tried a variety of pleating and folding ideas as some papers e.g. bark paper cannot be scrunched. These pictures show these results.

Next I tried making cobblestones using these papers to compare the effects.


I have waited to post anything until the work seemed to have any coherence and it has taken me this long! Some of the work is from a partially completed previous C&G course hence the change in colour scheme at times. The landscape work in chapter1 and 3 are put together with chapter8 at the end as suggested by Sian.
Initially I tried simple scrunching of increasingly thick papers to see the effects and glued them using PVA onto black paper. I have labelled the paper types.
Subscribe to:
Comments (Atom)


